Been a long time since the last update right? Unfortunately, winter doesn't exactly do wonders to finger dexterity and a simple matter of "life" has pre-occupied me for the last couple of months. Now that the weather is warming up here in Southern Ontario, however, I can get back to the CT70. In a week or so I'll be sure to bring bountiful loads of updates once I crack that engine apart.
In the meantime, I've been working on my daily commuter bike, a Honda CBR125R, which really isn't in dire need of modifications, but it looked sad and pitiful sitting there all stock =D
A couple of days ago I received a pair of frame sliders for my CBR125R in the mail. I read through the instructions (remove lower fairing, remove front engine hanger plate bolt, bolt on offset plate, then bolt on frame slider onto offset plate), but it needed the factory torque specs for the engine hangar screw plate, which I did not
have. Of course, this is where a website like CBR125r.ca comes in handy, and I logged on requesting for info.
A guy who had the factory service manual gave me the torque spec at 44 lb. ft of torque for the bolt, and I tried to go outside to install it.
First thing went wrong: The guy who sent me the frame sliders gave me M10 X 30 bolts instead of the required M8 X 30 bolts.
No problem though... the next day I went over to Crappy tire and got myself two of them, as well as two washers.
But here is where disaster struck: I was torquing the first bolt with the offset plate when the frickin bolt snapped on me! I looked at it in disbelief.
"Aw... s*$%."
Turns out that the factory service manual was vague and the guy gave me the wrong torque specs:
He wrote back after I reported my broken bolt, and I quote:
Oh crap! I'm really sorry... I think I led you down the garden path. Here is the exact section from the FSM. After this post don't listen to anything I type on this forum
Place the engine in the frame, then loosely install all
the bolts, nuts and front engine hanger plates.
Tighten the upper and lower engine hanger nuts to
the specified torque.
TORQUE:
Upper engine hanger nut:
60 N·m (6.1 kgf·m, 44 lbf·ft)
Lower engine hanger nut:
60 N·m (6.1 kgf·m, 44 lbf·ft)
Tighten the front engine hanger plates bolts
securely.
Tighten the front engine hanger nuts to the specified
torque.
TORQUE: 60 N·m (6.1 kgf·m, 44 lbf·ft)
It looks like Honda didn't feel fit to actually list the torque of the hanger plate bolts, if I'm reading that correctly.
According the FSM in the table for the Standard Torque Values lists as follows:
FASTENER TYPE N·m (kgf·m, lbf·ft)
8 mm bolt and nut 22 (2.2, 16)
10 mm bolt and nut 34 (3.5, 25)
I think I misinformed you to over-tighten that bolt by way too much... I apologize for the trouble I've caused.
Not his fault... what the heck is with this manual? Why would they be so vague on such an important bit of information as proper torque specs!?
In any case, what's done is done, so the only thing that I could do, is extract the screw...
The process of extracting a broken screw or bolt is what is known as an "adventure". This is especially true if your bolt was old and rusted... which fortunately, didn't apply to my case. However, it is a headache and if you're not careful with what you're doing, you could make things infinitely worse.
To begin with, you need the following tools: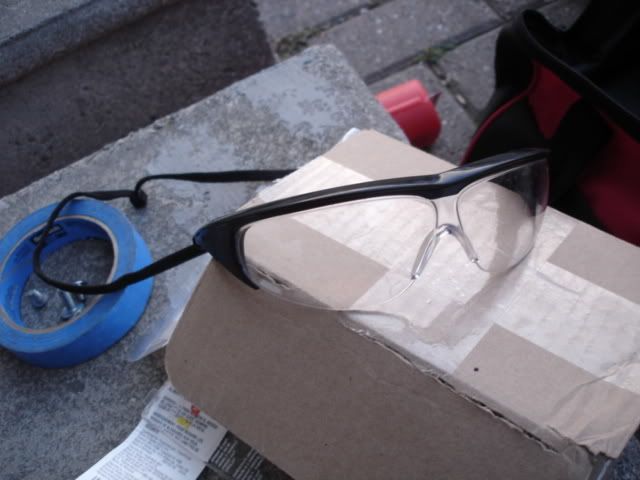
First and foremost, safety glasses (of course). You're going to be dealing with flying bits of metal... and if you mess up, possibly a high speed drill bit. A pair of cheap safety glasses is good insurance.
A screw extraction set. These can be found in most hardware stores nowadays... in fact, I picked up this Black and Decker set in Wal-Mart, for a relatively low price of $10 + tax. If you're going to be a weekend mechanic, or working on a restoration project, you WILL need these sooner or later, and they make a great addition to anyone's toolbox
An assortment of drill bits. When you buy a set of extractors, it'll usually come with a set of instructions telling you which size drill bit to use with each extractor. For example, I have a broken M8 bolt, which uses a size three extractor. This extractor bolt requires a drill bit of 5/64" diameter (yes, I love mixing metric and imperial measurements). However, I recommend you not only use the recommended drill bit size, but also include a number of smaller drill bits, and I'll explain why later.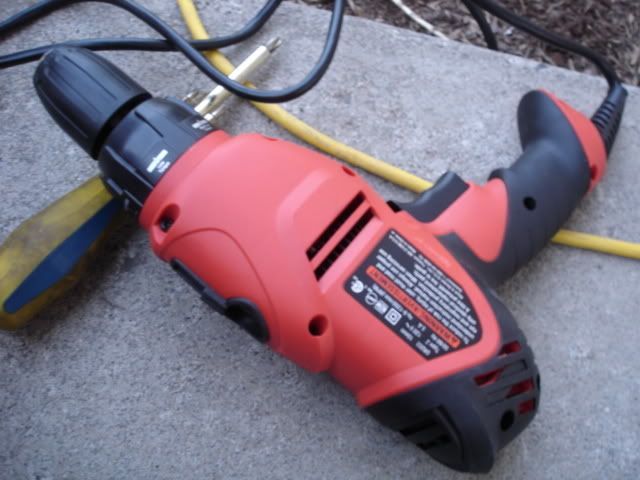
You'll need a drill. Duh...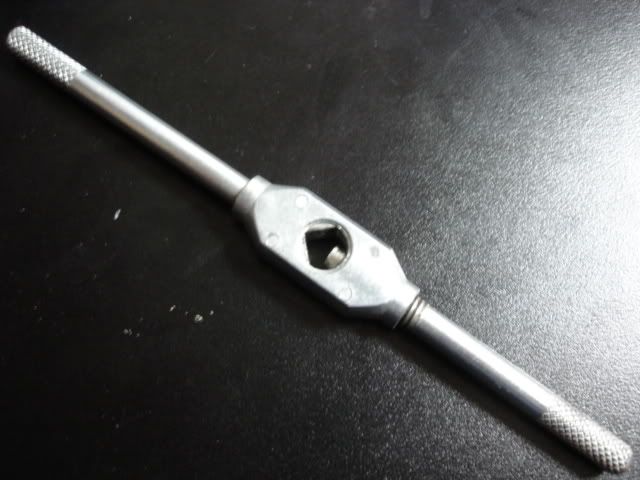
A T-bar. This piece attaches to the top of the bolt extractor. If you do not have this, an alternative is a pair of clamp pliers... but I would recommend this because it is an easier tool to use.
So now that you have all these tools, what are they all used for?
The most important one on this list (other than safety glasses!) is the extractor, obviously. The way an extractor works and the extraction process is actually quite simple and ingenious:
1. A hole is drilled in the broken bolt
2. Using a hammer, the extractor is tapped into the hole
3. Attach a t-bar onto the extractor, and... well, extract.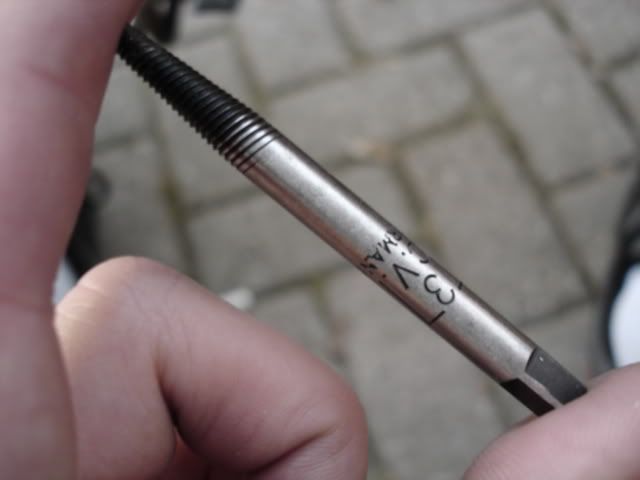
As you can see on this extractor, one end is threaded and is shaped like a cone... more importantly, those threads are running counterclockwise. What happens is that when you tap it into the hole, you attach a t-bar to it and start turning the bar counter-clockwise. The extractor will start screwing itself deeper into the broken bolt. Ideally, as it does this, the bolt will start turning counterclockwise, unscrewing itself and eventually extracting completely.
There are nuances to each step, of course.
1) To begin with, it's not exactly easy to simply start drilling a hole into a bolt. The weakest of bolts are made of medium carbon steel, which itself is already pretty solid material (these bolts will have a marking on the head of "8.8"). If you're really unlucky, you'll encounter such bolts markings as "10.9" etc., indicating heat treated alloy steel, which are 1.5 times stronger than regular medium carbon steel... (even more with higher numbers). If you were to simply attempt to take the recommended drill bit size that was listed for your particular extractor (in my case, a size 5/64 drill bit) and start drilling, you'll be at it for hours without making much progress.
Instead, start by drilling with the smallest available drill bit you have, in my case a 1/16th size bit. This does two things: a smaller drill bit will have an easier time drilling through steel; and secondly, it's easier to drill an accurate hole right in the center of the bolt with a smaller bit. This is crucial, especially if it's a hard to extract bolt (rusted in, for example), because if it's off center it'll make it even harder to extract (when you start turning the extractor you'll introduce all kinds of additional torsional forces). You can use specially made bits that are made for accurate drilling, called pilot drill bits... once again, I bought mine from Wal-Mart. Once you have your pilot hole drilled, drill again using increasingly larger sized drill bits until you reach your target size.
A few pointers: Take your time. Not only do you need to take your time in order to ensure an accurate hole, but remember to drill at moderately low revs and to hold your drill steady... or else you might snap the drill bit off. If you do this, you'll end up with a bigger problem than you started out with. Another important thing to note is to not drill through to the other side of the bolt. If you've got a drill stop, use it! The last thing you want to do is damage a engine crankcase or whatever else you weren't supposed to drill through!
And finally (and this applies only in the most desperate of cases), sometimes you'll find that the bolt is seemingly made of kryptonite and impossible to drill through. What you can try to do is to anneal it... that is, heat it up and let it cool back to room temperature. To do this, take a propane torch and start heating up the bolt in question, until it turns red hot. Use a directional flame to keep the area surrounding the bolt as cool as possible! Then, go and do something else while everything cools, and come back when your piece returns to room temperature, and try drilling again.
What you've done is changed the grain structure of the bolt. Chances are that if it's hard to cut through, it was initially put through a quench and tempering sequence that gave it a lot of strength by changing its grain structure. By annealing it, you've returned the steel back to its "original", weaker grain structure. At the same time, if the bolt was rusted in, you've likely freed up the threads a bit from the iron oxide that has built up over the years.
The reason I consider this a desperate, last resort type tactic is because you risk changing the metal grain structure of the piece you're working on as well. You have to make every attempt possible at keeping the surrounding area cool. That means to use a really small, concentrated bright white flame on the bolt in question, and hopefully not heating it up long enough that the surrounding metal turns red.
Here is how I drilled the hole in the bolt. If you'll notice, it's not completely on center, and this was because the bolt was broken off at a slight angle. Take your time with your initial pilot drill... it will ultimately determine if you're successful or not
2) Taking a hammer and the extractor, gently tap the extractor into the hole. The important thing to note here is to tap it in just so the threads of the extractor can "bite" into the bolt. Don't beat the snot out of the extractor- it is made of brittle carbide, so it is easy to break it off in the hole. If you break it into the hole, uh oh...
If you tapped it in right, the extractor should sit in the bolt cozily.
3) Attach the T-bar handle to the extractor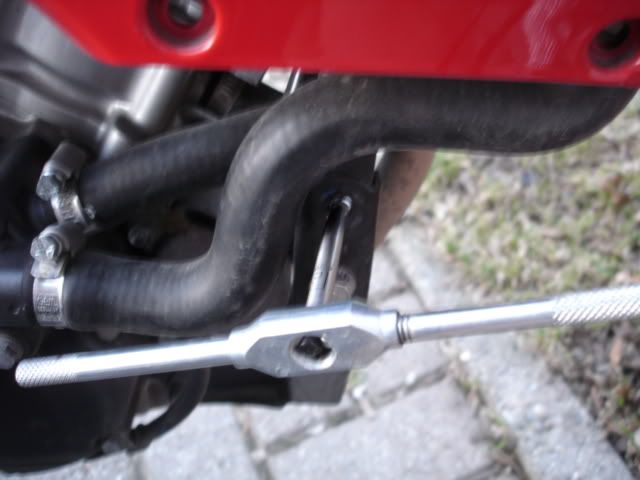
4) Start twisting the handle counterclockwise, while applying downward pressure. Make sure that the extractor has sufficient "bite" into the bolt. If it starts slipping out, then hammer it in more deeply. If that still doesn't work, drill a slightly larger hole and try again.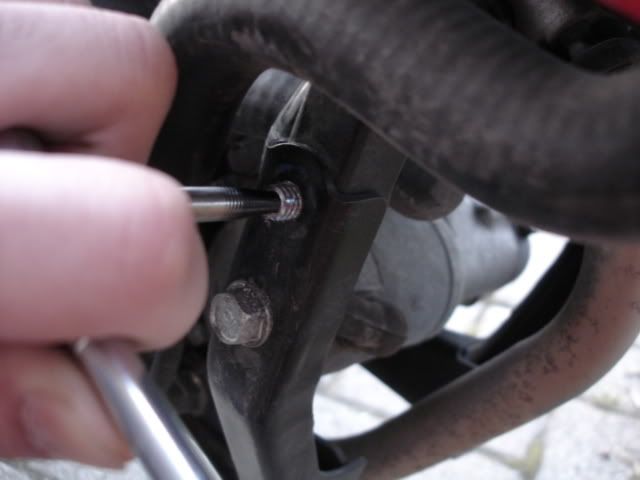
No tricks here... if your hole is on center, all you have to do is turn the handle slowly.
5) If all goes well... success!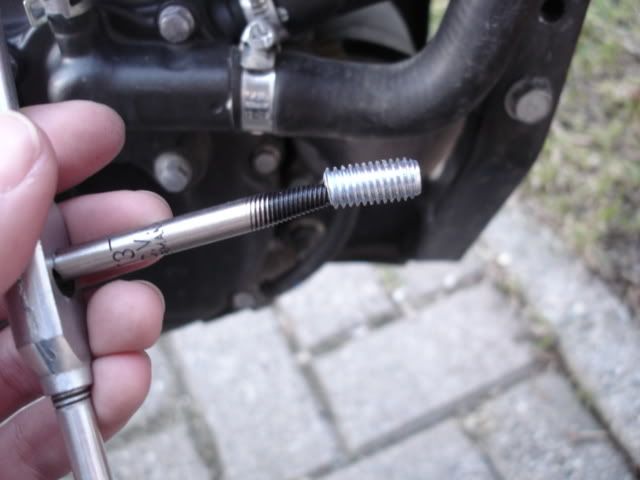

There's the little bugger. Take that and put it in your toolbox. You'll eventually have a collection of them. Each one will likely have a story attached to it, so keep them for the memories... and to warn your younger apprentices!
Sunday, April 20, 2008
Subscribe to:
Posts (Atom)